
Adventures in Homelab: Part 1
If you work in tech, and you use the cloud in any way, you've probably heard of Kubernetes. It's inescapable now, and there's no shortage of takes on it.
I've worked in a few companies that have used Kubernetes, but never been close to it. I've used in-house tools that communicate with it, or CI/CD systems that deploy my code in to it automatically. This has left me not really knowing what Kubernetes is or how it works.
That changes now.
I'm embarking on a journey to create a production-ready Kubernetes cluster in my own home.
# What's in this post
At the end of this post I will have shown you:
- How I installed Arch Linux on 3 Raspberry Pi 4Bs and got them ready to be kubelets
- How I bootstrapped a bare metal Kubernentes cluster on those Raspberry Pis
- How I set up pod networking in the cluster
# Things I bought
I've also wanted to slide down the /r/homelab rabbit hole for a while, so here's what I bought to get started:
- 3x Raspberry Pi 4 model B with power supplies and SD cards
- A rack mount for the Raspberry Pis
- A 12u 19" cabinet
- A 16 PoE port gigabit ethernet switch
- A rack mountable power strip
- A rack mountable shelf
- Some teeny weeny network cables
Here's what it all looks like when put together:
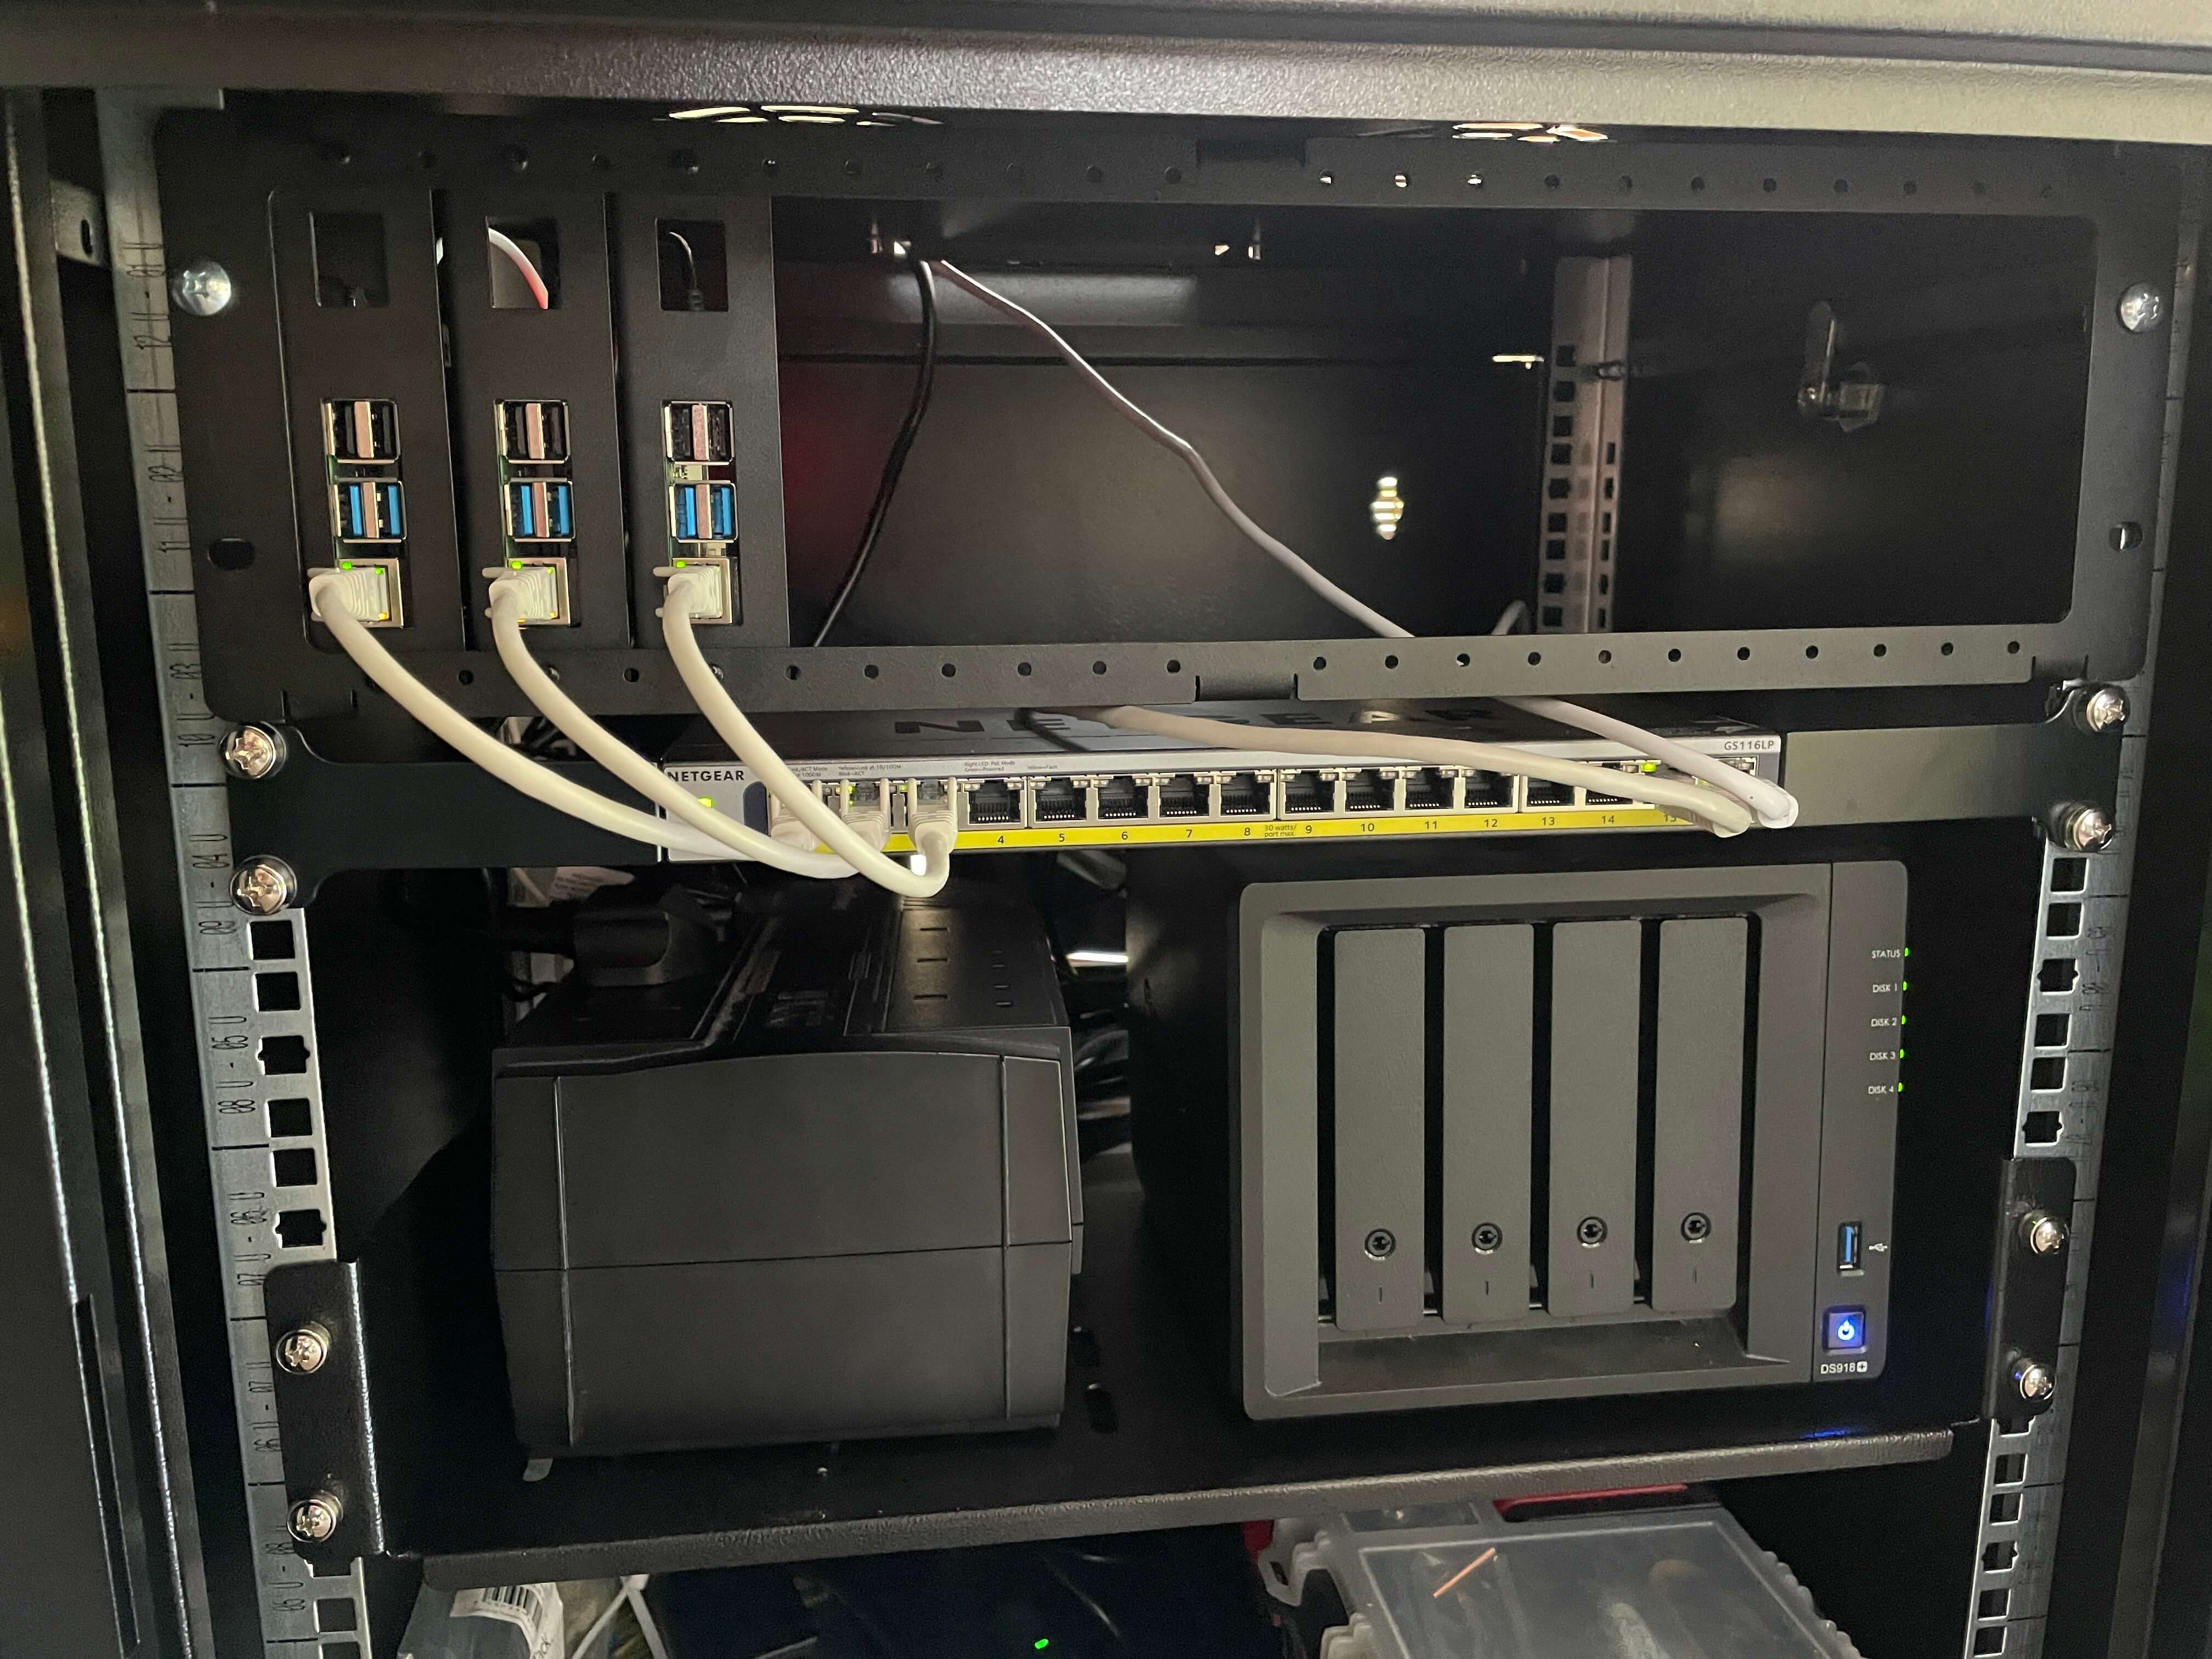
Also pictured here is the shelf, which is holding a UPS on the left and a NAS on the right. I had those things already, so didn't list them as part of what I bought for this project. While the UPS is optional, the NAS is quite critical to my setup. It will eventually host all of the persistent data for my cluster. More about this in the 2nd part of this series.
# Preparing the Pis
The first step is to get an OS running on the Raspberry Pis. While the official documentation on creating a bare metal Kubernetes cluster recommends using a deb/rpm-compatible Linux distribution, I'm a long-time fan of Arch Linux. Surely I can't be the first person to want to do this on Arch?
Fortunately, I'm not. Morten Linderud, part of the Arch Linux security team, has written a great blog post on getting a bare metal Kubernetes cluster working using Arch Linux. There's only one small gotcha: he didn't do it on Raspberry Pis.
Before running through the steps in his blog post, we need to get Arch running on the Pis. I followed this guide from the official Arch Linux website, which worked perfectly. I followed the ARMv7 installation guide because the disclaimer for AArch64 put me off a little. This decision hasn't hurt me so far, though I have occasionally had to look harder for docker images built for ARM and not ARM64 (thanks, Apple).
I'm going to use kubeadm to bootstrap my cluster, and while kubeadm is an
officially supported package in the Arch Linux repos, there's no ARM build of
it. There is, however, an ARM build in the AUR. I installed yay as
my preferred AUR tool.
To save some time, I'll tell you I needed to install all of the following on each pi:
yay -S kubeadm kubelet crictl conntrack-tools ethtool ebtables cni-plugins containerd socatA lot of them came up during the kubeadm init process. It runs a set of
"preflight checks" that require you to install necessary binaries. It also
checks to make sure your system has various capabilities, and one of these
was missing for me: memory cgroups. I had to add the following onto the end
of /boot/cmdline.txt:
cgroup_enable=memoryAnd reboot. It also warned me that the hugetlb cgroup wasn't enabled, but it
was an optional dependency and I decided to ignore it. This hasn't bitten me so
far.
The last thing I did was set the hostname of each of the nodes. Modify
/etc/hostname and name the nodes as you see fit. I used kubernetes-master,
kubernetes-worker-1, and kubernetes-worker-2. I also gave them static IPs in
my local network, and DNS names to make communicating with them easier.
# Bootstrapping the cluster
Step 1 to bootstrapping a cluster is to set up your master node. The Kubernetes
project ships a tool called kubeadm (Kubernetes admin) that makes this very
easy. I ran the following:
kubeadm init --pod-network-cidr 10.244.0.0/16 --upload-certsThe flag --pod-network-cidr is the desired subnet you want pods to live in. I
chose something that's very different to my home network so I would be able to
distinguish them. The flag --upload-certs I'm not really sure about. Martin
Linderud uses it in his blog post, so I did as well. From reading the
documentation on the flag it looks like I didn't need it, so try without if
you're feeling adventurous.
kubeadm init runs a set of preflight checks first. It's possible you will fail
some of those checks. In that case, make sure you do some searching to figure
out what's wrong and fix it before continuing.
When kubeadm init finishes, you'll see output that looks like this:
Your Kubernetes control-plane has initialized successfully!

To start using your cluster, you need to run the following as a regular user:

  mkdir -p $HOME/.kube
  sudo cp -i /etc/kubernetes/admin.conf $HOME/.kube/config
  sudo chown $(id -u):$(id -g) $HOME/.kube/config

You should now deploy a Pod network to the cluster.
Run "kubectl apply -f [podnetwork].yaml" with one of the options listed at:
  /docs/concepts/cluster-administration/addons/

You can now join any number of machines by running the following on each node
as root:

  kubeadm join <control-plane-host>:<control-plane-port> --token <token> --discovery-token-ca-cert-hash sha256:<hash>
Save that kubeadm join command, you'll need it in a few minutes.
It was at this point that I also copied the ~/.kube/config file to my main
development machine and closed the SSH connection to my master node.
# Pod networking

Pod networking has come up a couple of times now, but what is it?
A Kubernetes cluster consists of 0-n nodes. A node is a physical machine running
the kubelet daemon configured to be a part of your cluster. On a node, 0-n
pods can be running. A pod is a collection of 1-n containers that share a local
network. They're called pods as a reference to a pod of dolphins, according to
the book Kubernetes: Up and Running.
Because the networks that Kubernetes clusters are deployed in are extremely varied (from cloud providers to datacenters to home networks), and needs will differ dramatically, Kubernetes doesn't ship clusters with a way for pods to communicate with other pods by default. You need to select a third-party solution that fits your needs.
Deciding what pod networking solution is best for you is outside of the scope of this article, I'll just say that I went with flannel. It sounded simple and just sorts out networking between pods without any extra fancy features. Its limitations, primarily that nodes must be on the same physical network to each other, was not a concern for me.
Normally, you would install flannel like this:
kubectl apply -f https://raw.githubusercontent.com/coreos/flannel/master/Documentation/kube-flannel.ymlBut I found that this didn't work for me. There were two reasons:
- I was missing the
cni-pluginspackage - The default backend flannel uses,
vxlan, didn't work for some reason
While 1 took some time to figure out, largely by doing lots of
kubectl describe pod commands, it was a simple fix once I saw the error
message.
2, however, was tricky. Pod to pod communication by pure pod IP address worked
fine, but any communication through a cluster IP address hanged indefinitely.
After a lot of searching, I found someone suggesting to switch away from
flannel's default vxlan backend, to the host-gw backend.
What does all of this mean? Fuck if I know. All I know is that it fixed the
problem I was having. If you download the flannel manifest from the command
above and find the ConfigMap called kube-flannel-cfg, modify the bit called
net-conf.json so that it looks like this:
{
    "Network": "10.244.0.0/16",
    "Backend": {
        "Type": "host-gw"
    }
}
Last but not least, I found that I had to restart my master node after all of these changes. It takes a minute or two to boot back up, but when it did I was greeted with this:
$ kubectl get nodes
NAME                        STATUS   ROLES                  AGE     VERSION
kubernetes-master.local     Ready    control-plane,master   14m     v1.21.0
# Adding the worker nodes
Remember that kubeadm join command I said to save for later? Now is later.
Adding nodes to your cluster is as simple as running that join command on each
node.
One bit of weirdness I experienced is that after newly joining a node to the
cluster, it would get stuck in the NotReady state. This resolved itself after
rebooting each node. Not sure what that's all about, I'm assuming network
voodoo with flannel.
$ kubectl get nodes
NAME                        STATUS   ROLES                  AGE     VERSION
kubernetes-master.local     Ready    control-plane,master   20m     v1.21.0
kubernetes-worker-1.local   Ready    <none>                 2m      v1.21.0
kubernetes-worker-2.local   Ready    <none>                 1m      v1.21.0
# Conclusion
So now we have a working bare metal Kubernetes cluster, we're ready to start running things on it. We still have a long way to go until our cluster can run any kind of workload we want. We'll need to handle load balancing, persistent storage, and ingress resources. All of that is going to be in part 2.
We have an even longer way to go until we could call this a production-ready cluster. The main thing missing for that is that we'd need to run 3 master nodes, and this is something I want to explore in a future post.